I think I enjoyed the final weeks of the course the most because it was an opportunity to learn what I would call craft based bindings - non traditional bindings often used for artists books. While the majority of the class where attempting to rebind and repair antique books a couple of us got to learn about coptic and secret binding as well as a complicated and as I discovered, hard to duplicate, technique that results in a woven effect that uses the cover itself as the tapes for the signatures.
Both the coptic and the woven cover leaves the stitching exposed so it's a nice technique to use if you want to use coloured thread and in the case of coptic, if you want to vary the number of horizontal 'stitch lines' across the spine.
As with most binding, although the coptic looks like it is sewn across all the signatures at once, the sewing actually goes up and down the signatures, linking into the previous ones in order to form the herringbone type stitch across the spine. It is important to remember to start from the inside of the first signature and to sew the first signature directly to the prepared boards, which should have been skewered before starting.
The woven cover is more complicated and is best done with thin card, thicker textured paper or leather. As I found it is also best if you have two contrasting colours.


The template needs to be three times the size of your signatures, plus the width of your spine, plus any overlap you want round the edge. As a rough idea the two outer thirds will make up the bulk of your covers while the middle third will form the spine and the strips which will be woven through the other two thirds. The template should be attached to your cover material and cut out with a knife. The signatures are then sewn using straight binding and one of the sets of strips as the binding tapes before the second side is woven in and if necessary glued and trimmed at the edges. The nice thing about this type of cover is that you can vary the weaving to create different patterns or effects depending on the number and size of the strips you create. For example you could create a template that would allow only a couple of squares of the strips to show through.
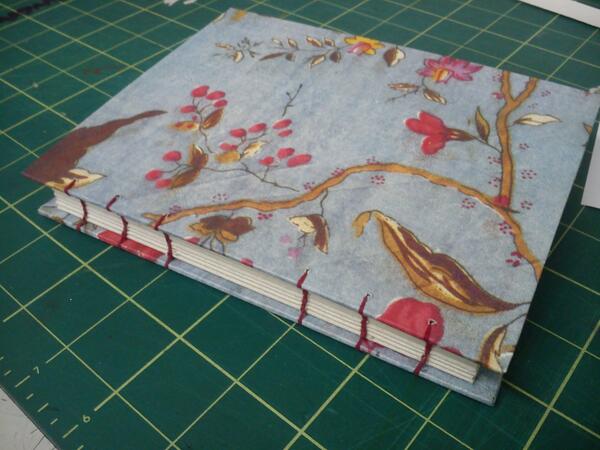
The final type of binding we did was secret Belgium binding, a technique that disguises how the signatures are attached to the cover. As with coptic you must prepare your boards first, covering them on both sides. As with traditional binding you also create a spine piece and this is covered separately. The front and back pieces of the spine need to be pierced and then sewn together starting from the inside and done in such a way that the spine piece is woven between the stitches. It is important for the next stage that you have an even number of holes arranged in paris. Essentially you go back and forth across the spine trapping it between the thread.

Once your cover is complete you can stitch in the signatures, using the pairs of thread on the inside of the spine as your tapes. This becomes progressively more difficult as there will be less and less give in the threads. It helps to keep the signatures as near vertical as possible and to artificially press them down while you are stitching. The finished book will be fairly loose but makes a nice artists book, the technique goes particularly well with torn rather than trimmed edges.
Unfortunately due to hockey commitments I won't be returning to Bath College for another term although I would very much like to as I still have techniques to perfect and ideas to try out. I would recommend the course to anyone interested in bookbinding, it was enjoyable, taught well and I thought good value for money. I'm hoping it will be running next summer when hockey has finished and I can return for another term.
No comments:
Post a Comment